







Start barndominium floor plans with a room and activity program
Useful barndominium floor plans begin with the people, equipment and daily activities the building must accommodate. Allocate living rooms, shop operations and the paths between them before settling on the exterior footprint. Then test the arrangement against the site, structure, services and locally applicable residential requirements. An attractive drawing can still fail if groceries pass through a working vehicle bay, a bedroom loses its exterior window location, or equipment storage occupies the only convenient household entrance.
Make two inventories before drawing partitions. For the living side, list occupants, sleeping arrangements, working from home, guests, laundry, storage and the furniture you actually intend to keep. For the shop side, record each vehicle or large item in its parked position and in use. A truck with doors closed occupies a different envelope from the same truck with doors open while someone unloads it. A workbench also needs room for its operator, stock handling and the longest material you expect to cut or assemble.
Turn those inventories into priorities. A family that enters through the shop every day may value a mudroom connection more than a formal foyer. Someone who receives frequent visitors may need a separate front entrance that never exposes household guests to active tools. A household with night-shift workers may prioritize distance between bedrooms and noisy activities. These are design choices to resolve explicitly; the word barndominium does not select an appropriate floor plan for them.
- Nonnegotiable: rooms and activities that make the home usable from the first day. Record why each must occupy a particular location.
- Flexible: spaces that can share a function, change size or move without undermining the household routine. A guest room and occasional office may overlap; a vehicle maneuvering path and permanent storage usually cannot.
- Future: additions or changes that need a reserved location, structural allowance or service route now. Distinguish an intention to expand from work already engineered and approved.
Keep the resulting program short enough to compare against every drawing revision. When a plan exceeds the available footprint, reduce optional demands consciously instead of quietly shrinking circulation or leaving mechanical equipment unplaced. A useful decision record says what was traded away and what remained protected. That makes later discussions with a designer more productive than asking for a bigger-looking living area without identifying what must move.
Separate gross footprint from the space you can actually use
The first arithmetic in barndominium floor plans should distinguish the outside building footprint from interior allocations and usable furnished space. A gross rectangle includes the area occupied by walls and other construction. A room schedule may describe dimensions between finished surfaces. Conditioned area is another category, while the area accepted for appraisal, permitting or another formal purpose depends on the applicable method. Label the basis of every number rather than presenting several incompatible area figures as if they were interchangeable.
Use a simple ledger with a line for each major claim on the footprint: living zone, shop zone, transition and service zone, construction allowances, and any other excluded or separately measured space. The ledger should reconcile to the same starting rectangle. It is a bookkeeping device for design, not a certification of finished living area. When partitions become thicker or a structural enclosure changes, revise the ledger instead of letting the room labels conceal the loss.
Next, put furniture and equipment inside the room outlines. A dining room that looks generous when empty can become the main passage between the kitchen and exterior door once chairs are occupied. A shop can fit the vehicles on paper while leaving no convenient access to stored equipment. Trace usable space around those objects. The question is whether the household can perform the intended activity while adjacent activities are happening, not whether an isolated symbol fits within a rectangle.
| Category | What to record | Question it answers |
|---|---|---|
| Gross footprint | Exterior planning rectangle and measurement basis | What is the initial area available to allocate? |
| Living allocation | Rooms, storage and household circulation before detailed assembly deductions | Does the household program fit? |
| Shop allocation | Parking, operating space, material handling and shop storage | Can equipment be used as well as parked? |
| Transition and service allocation | House/shop connection, utilities and maintenance access | Which necessary functions have not yet received a place? |
| Detailed usable area | Interior dimensions after walls and equipment are coordinated | Does the finished arrangement still work? |
Watch for double counting. If a tool requires a clear operating area, that same floor cannot also hold permanent storage. A route that works only when a vehicle is outside should be marked as conditional, not described as ordinary household circulation. Make these assumptions visible early, while moving a line is still easier than moving a wall or a drain.
Compare side-by-side and end-loaded living and shop arrangements
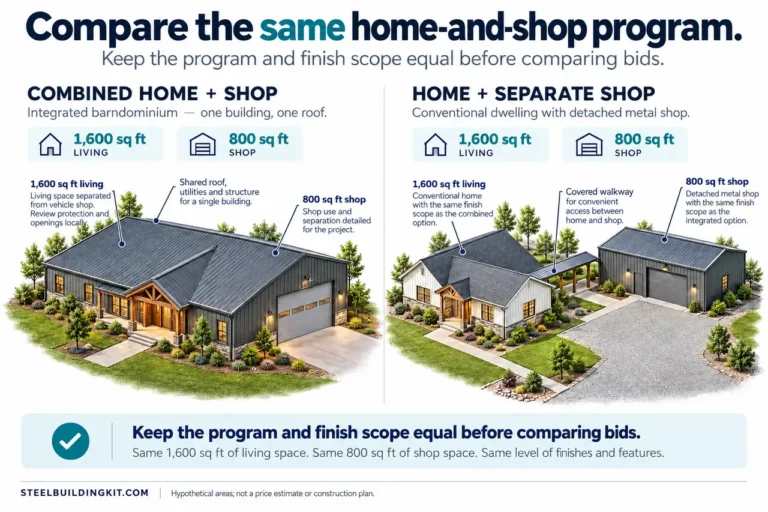
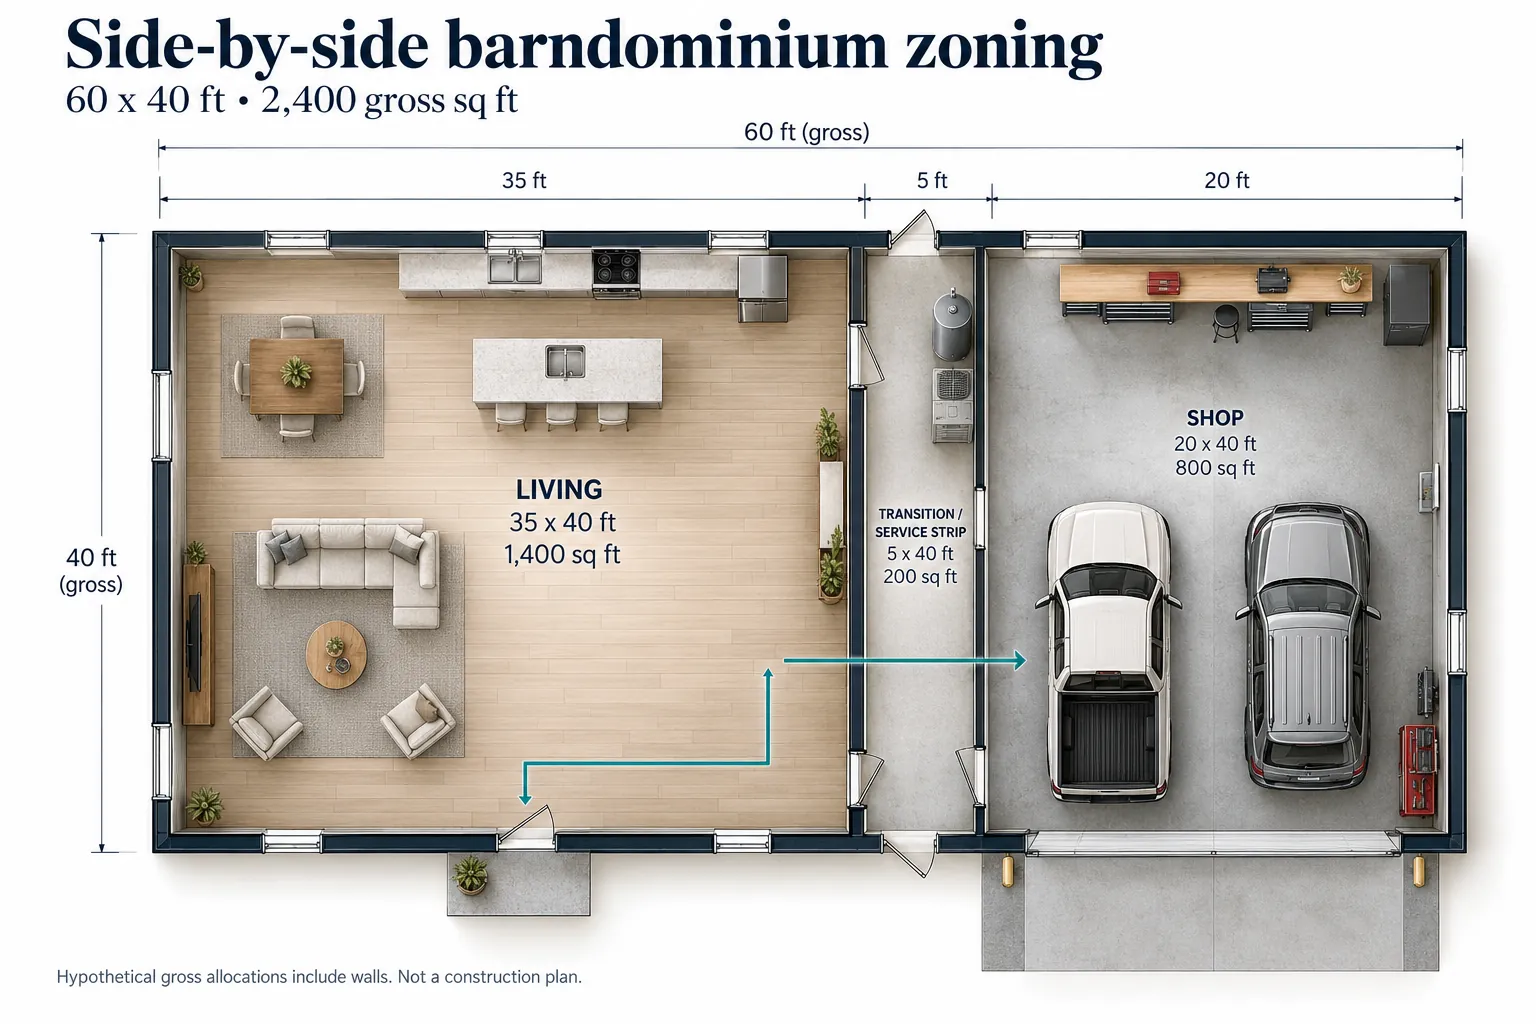
A side-by-side arrangement puts the living and shop zones along the same building depth. It can give both functions direct exterior frontage and allow a compact connection between them. Its long shared boundary also creates more places where rooms, services and shop activities meet. Review that boundary deliberately. Bedrooms, kitchen cabinets, mechanical penetrations and storage should not arrive there independently and leave someone else to resolve the collisions.
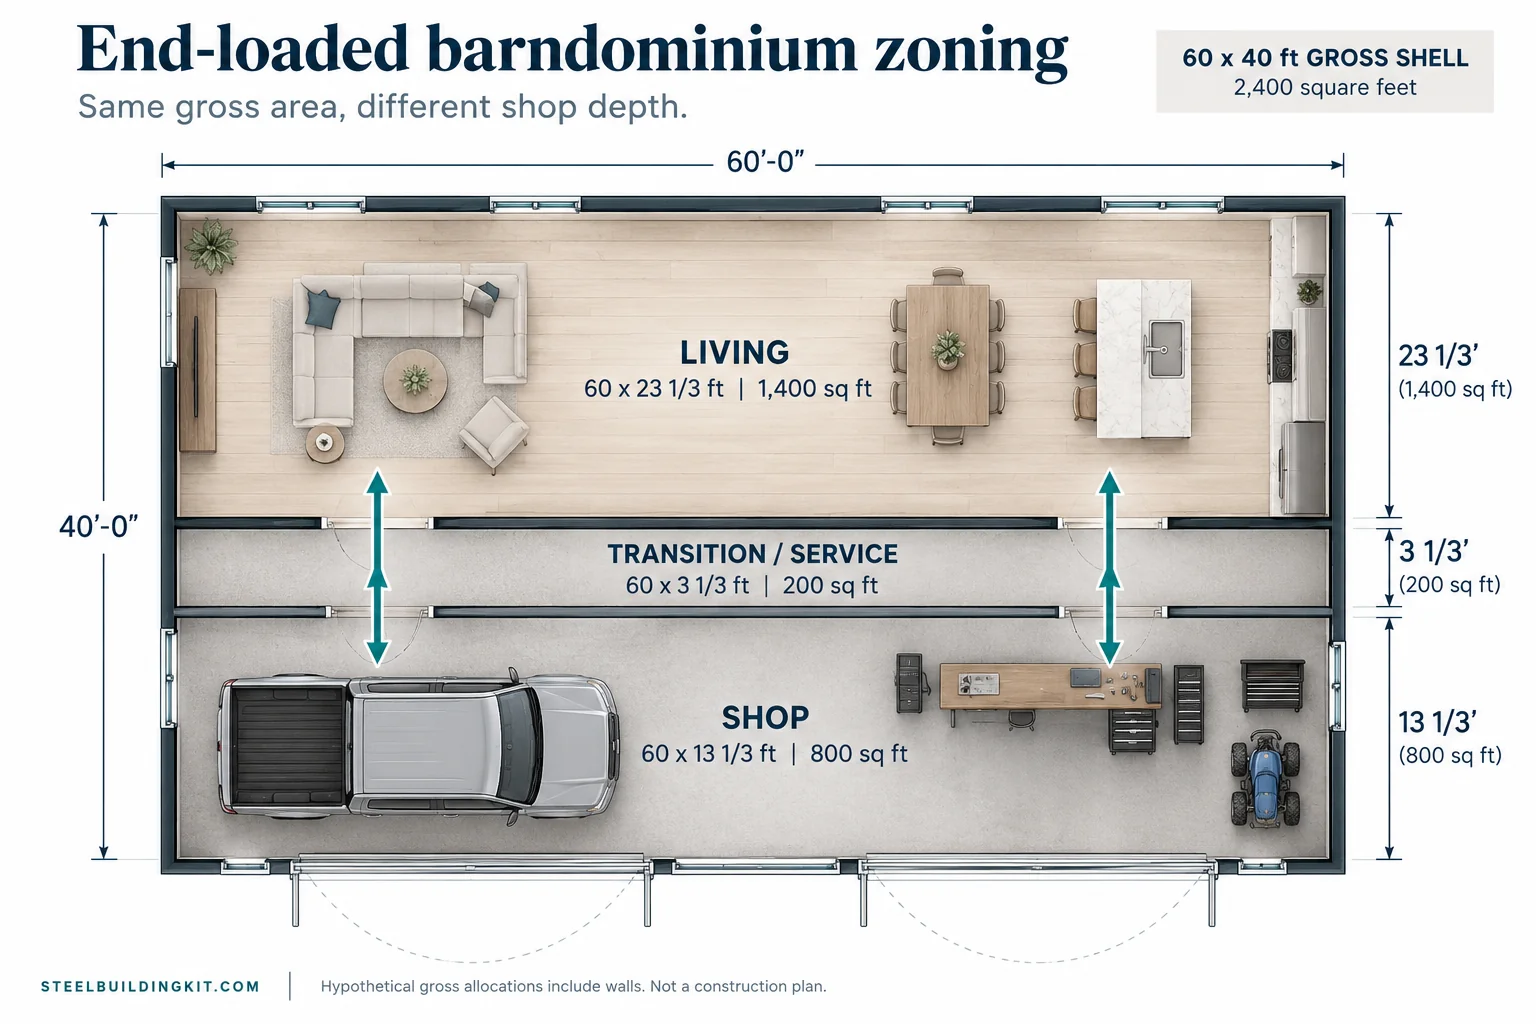
An end-loaded arrangement puts living space toward one end of the building and shop space toward the other. This may suit the site approach or a household that wants a clear separation between visitor arrival and work activity. It can also lengthen the path from a particular parking position to the kitchen or laundry. Whether that is acceptable depends on where doors, vehicles and the household entrance actually sit. The labels alone do not establish a better layout.
Compare these arrangements using the same room program and the same equipment inventory. Otherwise one drawing can appear superior simply because it contains less storage or a smaller shop. Mark the exterior faces needed for windows, ordinary doors and large shop openings. Add the site approach and preferred outdoor areas to the drawing. A floor plan that works inside an isolated rectangle may become awkward when the driveway arrives on the opposite side or the household wants a private outdoor living space.
The 2021 International Residential Code model provisions address dwelling-garage openings, separation and a dwelling egress path that does not require travel through a garage. They are a reference for questions to resolve with the local authority, not proof that a particular drawing is approved. Confirm the adopted edition, amendments and classification of the intended shop activities. A private garage assumption may not describe a space used for other processes or business activity.
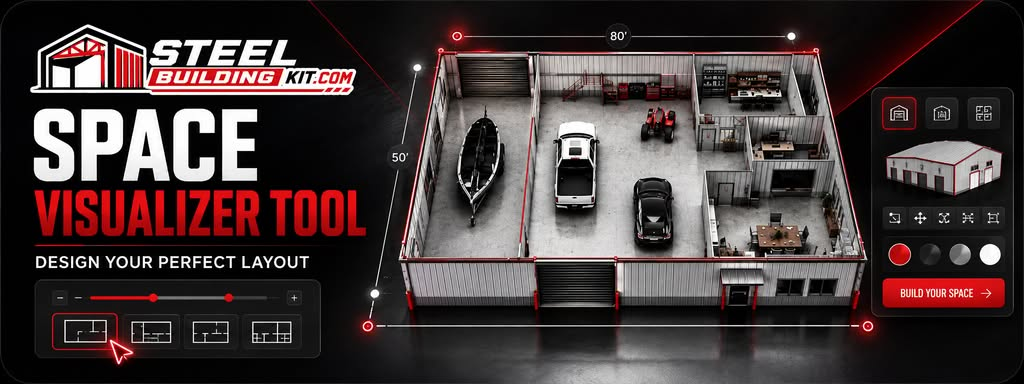
Use the existing metal building layout library to compare how parking, work areas and circulation are represented. Bring the same discipline into residential planning: keep the household route legible, identify active work zones and reserve access to the outside. A clear plan lets a reviewer see the intended functions without guessing which empty space is supposed to remain open.
Run separate route tests for people, vehicles and bulky loads
Draw several route overlays on barndominium floor plans rather than using one general circulation arrow. Start with a resident arriving with groceries while the shop is occupied. Trace the path from the likely parking position to the kitchen, including every door and change in direction. Then repeat the test for laundry, a visitor who does not enter the shop, a child going outside and someone carrying a bulky object. Each overlay exposes a different weakness.
At each crossing, ask what happens when the adjacent space is being used normally. Is a person walking behind a vehicle that is moving? Does an open household door conflict with a bench or a stored item? Must a guest step through a messy work area to reach a bathroom? Does a long board being carried through the shop block the household connection? Record the conflict and change the arrangement, door location or operating assumption. Do not hide the problem under a larger circulation label.
Keep routine convenience and emergency escape review separate. An arrangement can be convenient for daily use while still leaving an unresolved code question. Show the intended exterior household door and sleeping-room locations clearly on the drawing, then have the designer identify the locally applicable provisions. Avoid assigning a bedroom to an internal leftover corner merely because its furniture fits. The consequences of room use extend beyond its floor area.
- Mark origins and destinations using real household tasks. Include parking, kitchen, laundry, bedrooms, exterior doors and the shop work area.
- Draw the route while all normal furniture and equipment remain in place. Record any assumption that a vehicle, chair or stored item must first move.
- Circle crossings and narrow decision points. Test simultaneous activities, such as unloading groceries during a project, instead of imagining each route in isolation.
- Revise the plan and repeat only the affected routes. Keep the earlier version long enough to explain whether the change improved one task while making another worse.
A route test also helps prevent overbuilding. Sometimes a relocated entrance or a modestly different room arrangement solves the problem that initially appeared to require a larger shell. Sometimes the test confirms that the chosen program genuinely needs more room. Either result is useful because it rests on a specific activity and a visible conflict. Treat those findings as planning evidence, not as a promise that an unreviewed layout is safe or compliant.
Place wet rooms, service access and the dwelling boundary together
Kitchen, laundry and bathroom locations should be coordinated with plumbing and site services before the plan is treated as settled. Clustering wet rooms can make the service concept easier to organize, but it should not force an unusable room arrangement or replace actual drainage design. Sketch the proposed service routes and identify who will verify them. A floor-plan revision that moves a sink is also a coordination change when the slab and outside wastewater connection are being planned.
Mechanical equipment needs a deliberate location and a maintenance route. Draw the equipment allowance, access side and route for replacement rather than assigning an unlabeled closet after the bedrooms are finished. Ask where ducts, pipes or electrical runs cross structure and the dwelling/shop boundary. This is particularly useful when a large open shop and smaller residential rooms share one outer building, because their service needs may pull the design in different directions.
The Building America Solution Center guidance on attached-garage air sealing calls for a continuous air barrier separating the garage from conditioned living space and sealing the gaps and penetrations that create unwanted pathways. That guidance explains why the common boundary belongs in early coordination. Air sealing and required fire protection are related design tasks with different purposes; a neat partition line on a floor plan does not establish that either has been resolved.
A utility room, mudroom or storage zone may provide useful distance between a noisy activity and a bedroom. Evaluate such a buffer according to the activity and the available floor area. It is a planning choice, not a universal rule requiring a specific room or width. A buffer also does not replace the locally required dwelling/shop protection. Keep its household function clear so that it does not become a convenient-looking space that later fills with equipment and blocks circulation.
DOE describes home performance as a whole-house design problem involving interdependent systems. Apply that principle by drawing the intended conditioned boundary and discussing it with the envelope and mechanical designers. Whether the shop is unconditioned, separately conditioned or included in a larger design affects the coordination questions. Avoid selecting equipment solely from the gross shell area before the intended zones and assemblies are established.
Worked example: test a 60 by 40 gross planning rectangle
Consider a hypothetical 60-foot-wide by 40-foot-deep rectangle. Its gross planning area is 2,400 square feet. For an initial side-by-side study, allocate a 35-by-40 strip to living functions, a 20-by-40 strip to shop functions and a 5-by-40 strip to transition and service functions. The respective gross allocations are 1,400, 800 and 200 square feet, and their widths add to 60 feet. These are illustrative planning divisions before walls, assemblies or formal area measurement.
The 5-foot strip is not a recommended or required passage width. It is an accounting allocation for the exercise, and its eventual contents may occupy different shapes rather than one continuous corridor. Likewise, the 1,400-square-foot living allocation is not a claim of 1,400 finished or appraisable living square feet. The purpose of the ledger is to expose every major use of the initial rectangle while there is still time to change the distribution.
Suppose the household wants two bedrooms, an office, an open kitchen/living area and a shop holding two vehicles plus a bench. Place scaled furniture and the actual vehicle envelopes in the proposed zones. The first pass might reveal that the kitchen entrance lies behind a parked vehicle, while the office occupies a useful exterior face that a bedroom needs. Move the transition point and compare the bedroom/office placement before increasing the building dimensions. The reasoning follows the conflict; it does not assume that this program necessarily fits.
Now redraw the same allocations as an end-loaded concept rather than quietly deleting space to make the alternative attractive. The living and shop portions may have different proportions, and the transition/service allocation must still be shown. Trace the same grocery, visitor and material-handling routes. If the end-loaded version improves visitor access but lengthens daily unloading, record both outcomes. The household can then decide which task matters more and ask whether another door arrangement resolves the tradeoff.
Finally, deduct realistic assembly and service allowances with the designer and repeat the furniture test. If a bedroom becomes too tight, the correct response is to revise the program, partitions or footprint openly. Do not preserve the original headline area by counting shop space as living space. Keep a dated ledger with each drawing revision so a changed allocation cannot be mistaken for a comparable design.
What to settle before ordering a shell or freezing the slab layout
A useful floor-plan handoff contains more than a clean room outline. Include the activity program, area ledger, furniture and equipment placement, exterior openings, route overlays and a list of unresolved decisions. These documents give the designer a coherent description of what the home must do. They also make it easier to identify whether a supplier drawing addresses only the structure or incorporates the residential design assumptions the household is relying on.
Ask for coordinated review of structural layout, room use, dwelling/shop boundary, services and the site relationship. Identify who is responsible for each part and which drawings must agree. An equipment door affects the frame and driveway approach; a bathroom affects drainage; a bedroom affects the residential planning review. Treat these as linked decisions rather than separate purchases. Freeze the large openings and slab-sensitive locations only after the relevant people have resolved the dependencies.
Can you start from a stock plan? Yes, as a program and arrangement reference, provided it is adapted to the actual site, household, structure and local requirements. A stock drawing is most useful when you can explain which functions it solves and which assumptions remain unverified. Buying a drawing or selecting a familiar footprint does not itself answer the site, engineering or approval questions. Keep the adaptation work in the project scope.
How much of the building should be shop space? There is no useful universal percentage for this decision. Determine the shop allocation from parked items, operating envelopes, material handling and storage, then compare what remains with the household program. If the two programs cannot fit without overlapping incompatible activities, change the allocation, program or footprint. A smaller shop is not an improvement when it forces routine storage into the household connection.
Use the steel building buyers guide to place the coordinated plan within the wider buying process. Before committing, retain a written list of what is included, what requires separate design and what still awaits local confirmation. The practical next step is a reviewable plan package that shows the same room uses, openings, services and area assumptions to everyone involved. That is the point at which barndominium floor plans become a reliable basis for project decisions rather than an appealing sketch.